In this article I will demonstrate how to start a basic analysis of an ARM firmware image. As an example we will take a look into the widely available firmware of ANYTONE 878UVII radios. The techniques explained in this article can also be used for other ARM based firmware and for images of a wide range of devices. Most of the info in this article is ARM generic.
This article assumes that you are basically familiar with IDA Pro and that you have looked into normal binaries at least once. If you are not familiar with IDA, just search the web a bit. There are many great beginner tutorials out there. These will teach you the required basics.
The Firmware Image
To start of, all you need is IDA Pro and the firmware images of our target ANYTONE 878UVII radio. The required image can be downloaded from the distributors website. It doesn’t really matter which version you download, but this article was written based on the 2.04 version.

Within the update package you will find the FW folder, which contains three files. A CDI, SPI and a CDD file. The CDD is the largest of the files and this is actually the firmware image we need.
We are quite lucky here, since the firmware image is not encrypted of otherwise protected. It is simply an image of the internal flash memory and it doesn’t even carry a file header. The file’s metadata is split into separate files. So we can simply load the CDD in IDA Pro.
Technical Background
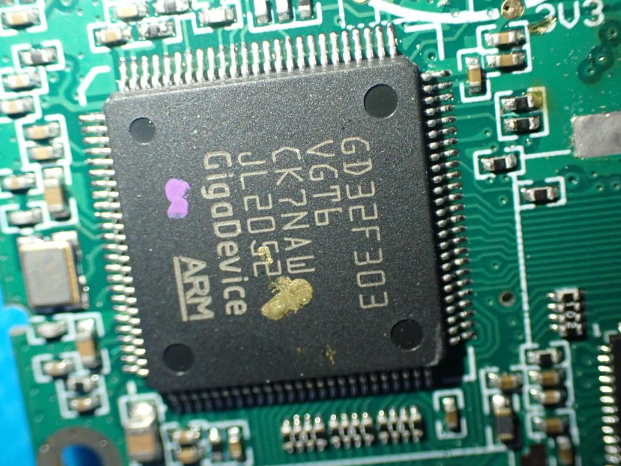
The series of ANYTONE 878 radios is based on GigaDevice GD32 ARM Cortex-M4 microcontrollers. This can be easily looked up by disassembling the radio and taking a look at the chips inside.
Another more convenient way is to ask the FCC. If your device was FCC approved, there should be public information about it available online. Do a search for the manufacturer with the FCC directly or in an independent database. Most of the time you will find a document labeled “internal photos“. This document should provide you a lot of interesting information. No disassembly required.
What is important is that you download the datasheet of the CPU and save it for later use. It will tell you all the interesting stuff I will set in the next steps.
Basic CPU Settings
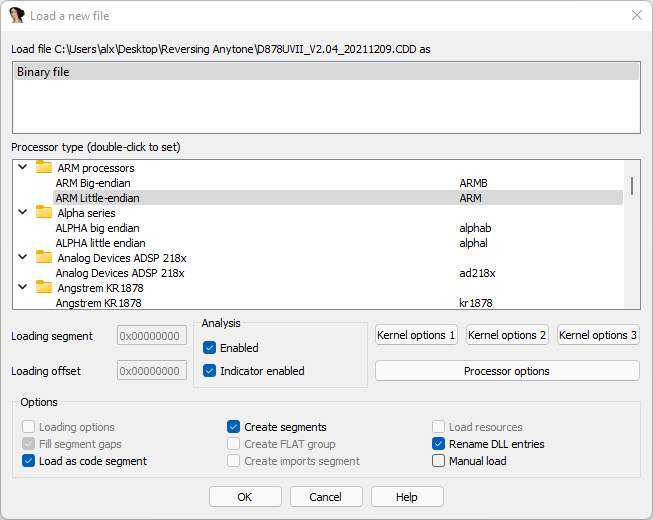
The first thing to do is, drag the CDD on the open IDA Pro window or open it via the File menu. IDA will detect the file as a binary. Select the “Processor type” as “ARM little-endian” as shown below.
Don’t press “Ok” just yet. The next step is making some settings to the processor options. We learned that this devices use an ARMv7E-M based CPU. Therefore we have to change the processor options accordingly. Look at the screenshot below for the best settings. The middle pane can be found by pressing the “Edit ARM architecture Options” button within the “Processor options” menu.
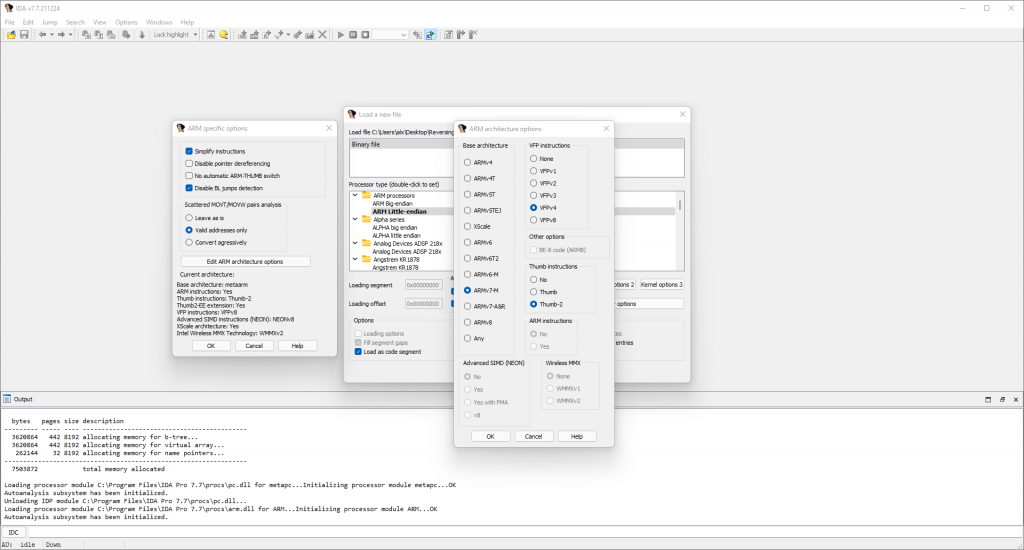
Since Cortex-M is thumb only, so no further thumb related settings are needed here.
Loading the Image
Now you are done with the basic CPU settings. Let’s proceed to the next step and relocate the loaded firmware image to it’s correct offset. The firmware image is loaded into the ROM section of the IDA database. Since the CPU won’t load the image from 0x00 where it starts in the file we have to relocate it. If this step is skipped, cross references will be broken and disassembling the file won’t work properly. The ARM CPU used in our target device will require the image to start at offset 0x8004000. This is the memory location mapped to the physical ROM, so we map our file to this address.
Press Ok on the “Load new file” dialog and you will be presented with the dialog as shown below. Normally the RAM size and ROM size don’t need adjustments. They are correctly auto filled for now.
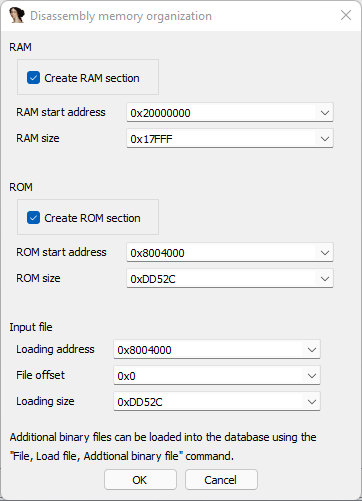
The next thing to do is creating a RAM section. Tick the box “Create RAM section”, the RAM will start at 0x20000000 and has a size of 0x17FFF.
How to Find the Correct Memory Offsets
If you are doing this the first time you will ask yourself how I got these values at all. The answer is pretty simple, you find them in the datasheet we downloaded earlier.
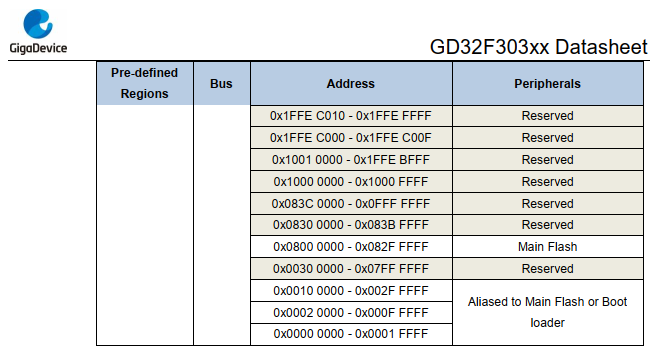
Start with the memory map on page 17 and you will find the loading address of the main flash (firmware file). On page 16 you can find the SRAM offset and the size of this segment.
Simple isn’t it? All you did above is relocating the file/image to the correct location taken from our datasheet. There are many more segments used by the CPU. If you encounter a reference which are backgrounded in red during your journey, it is very likely that you miss another segment. But more on this later.
There is a little trick regarding the main flash, it seems the first 0x4000 are taken by the bootloader so our binary has to be located at 0x8004000. Thanks to Igor for pointing this out!
Binary Structure
The first view on IDA will be rather odd. No auto analysis as usual, no code, just a lot of hex. Did you do something wrong? Most likely not. This is normal if you are analyzing firmware images in IDA Pro. The difficulty is that you have to start the analysis on your own.
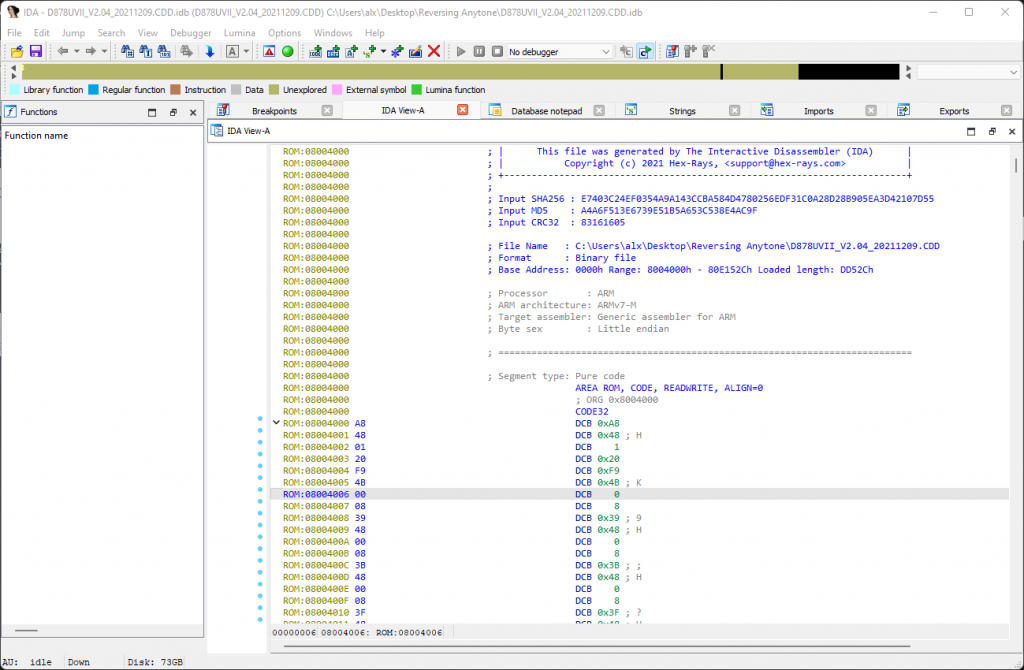
But this isn’t as bad as it might sound in first place. We will move to the start of the file. This is the place where the ARM CPU will start code execution. At this offset a structure called vector table is located and it is detailed very well in the ARM Cortex generic user guide.
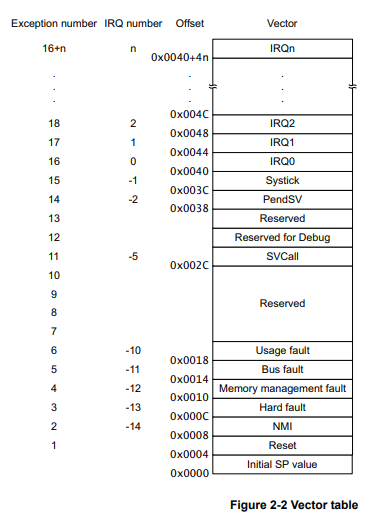
As we can see in the graphics from the user guide, offset 0x0000 (0x08004000) contains the initial stack pointer. The CPU will load the next four byte at this address and use it as a pointer to the future stack.
Reset Handler
The next bytes are various handlers, the most important one is the reset handler. This is where the CPU will jump if it wants to boot or reboot.
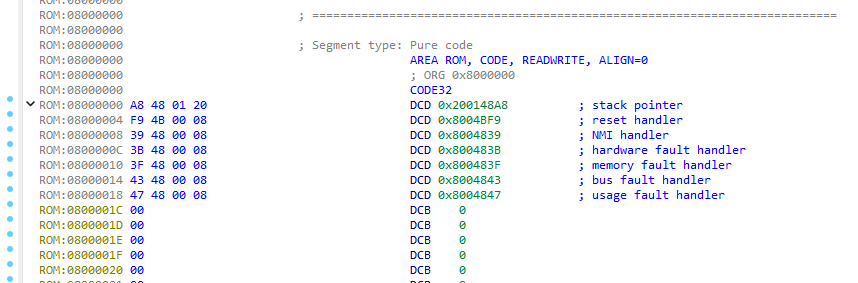
It is again a 4 byte address which should nicely resolve in your image. As the linked ARM user guide article tells us, the handler is Thumb if the least significant bit of the address is 1.
In our case the last byte of the address is 0xF9 which translates to 11111001b. The least significant bit is indeed 1. Therefore we need to change the entry point of the reset handler to Thumb. The real offset of the reset handler also shifts by one byte due to this bit.
0xF9 = 11111001b (with Thumb indicator)
0xF8 = 11111000b (without)
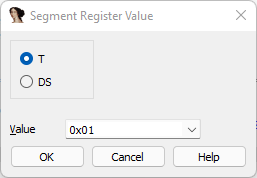
Click on the offset to jump to the reset handler and subtract 1 byte. Now press “Alt+G” to open a dialog and define the following section as Thumb (CODE16).
This project is mostly Thumb only, therefore you can start the Thumb code from the first byte in the ROM segment too. Please keep in mind that this is not generic for all ARM projects. But for this one it is.
After changing the current offset to CODE16, press “C” to create code at this offset. You should be able to see the reset handler code now.

Finding more Code and Strings
Ok but creating all the code by hand will be rather complicated. Don’t worry, we will use some scripts now. Maddie Stone created very handy scripts for IDA Pro which will greatly assist you here.
Since her scripts are not working with newer IDA versions (7.7 being the latest at time of this writing), I have put fixed versions for IDA 7.x up on my Github, you can find them here. I also added some additional lines for this ARM based project here.
First use the script “define_code_functions.py” to create code from 0x08004000 to approx. 0x080963DC. If the script asks you if you want to undefine existing code press “No”.
IDA Pro should be working a bit and your ROM section should start to look much more interesting at this point.

Next use “make_strings.py” to create strings in the remaining part of the ROM section. You will find a lot of interesting strings in there.
A Word on String References
There is one oddity if analyzing this firmware. As the developers at ANYTONE created the firmware for multiple languages, they use reference tables. You will miss the references to these strings. This happens because the strings are dynamically loaded, based on the selected language. IDA is sadly unable to resolve this in static analysis.
Still, some of the strings from the boot process are embedded directly and resolve nicely. They are a good starting point for your further journey.
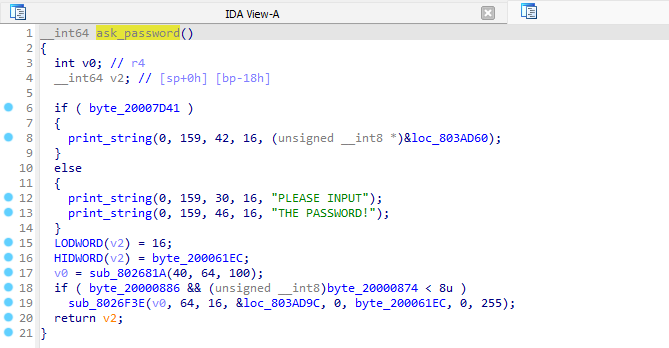
To proceed further from here start to identify some of the basic OS functions, i.e. functions to operate the embedded strings. Good candidates are “print” as or “read” like functions. Or even “memcpy” and other common functions present in every OS.
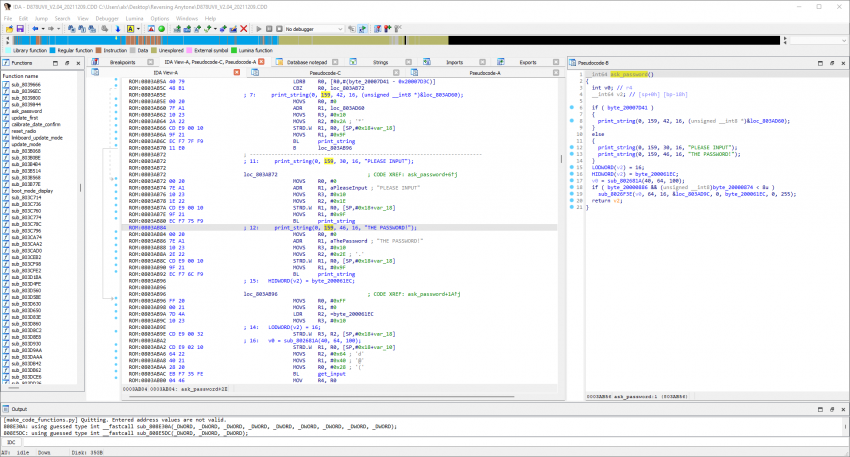
Very noticeable is the “print_string” function (I renamed it like that once it was identified). It takes some coordinates and a string as argument and will display the string on screen at the given location. This function is used a lot in the boot menus.
From strings present in the firmware image it was possible to identify the RTOS (Real Time Operating System) used by the device as μC/OS-II. μC/OS-II is a free RTOS written in ANSI C. More interesting info, as well as the documentation, can be found here, the code is here. Use this as a reference, it will help you a lot.
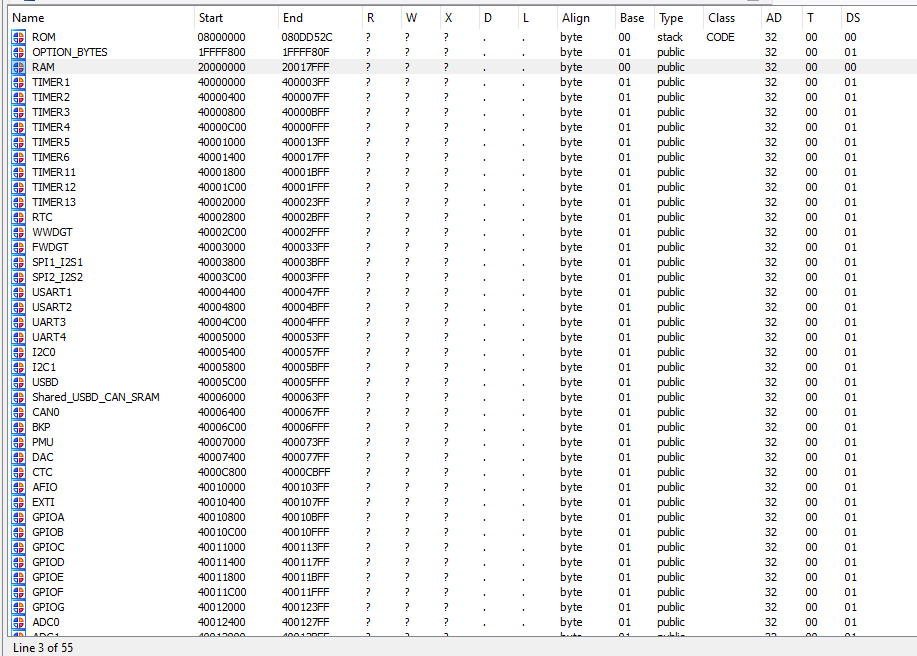
I/O and Peripherals
ARM based CPUs like this one use special memory regions to address buses, GPIO, I/O or simply timer and clocks. Take a look at the datasheet again. At page 14 you will find the memory map we used to specify our loading offsets. This map contains the special memory regions you want to add to your database as well.
Open the segments view in IDA and add them to your database. The result should looks similar to what is shown on the screenshot below. If you are lazy, feel free to use this IDC to facilitate the process.
Now re-run the auto-analysis (Options -> General -> Reanalyse program) to create cross references.
Once you did the above steps, start to look into interesting regions and see if there are any cross references to them. These will help you to find functions which use specific buses, GPIO or I/O.
If you look for the function which operates the UART, just check the UART regions and you will find references to it. This is especially useful in scenarios when you have no or only a very few strings as references.
How to Proceed
I think at this point you should have everything needed to start your own research into this topic. Feel free to leave me comments. In case you have any further questions just ask. I am always happy to see people share interesting finds too.
Happy hacking!
Update 01/04/22
– thanks Igor for the useful comment regarding the 0x4000 offset/bootloader margin.
– added an IDC for segments creation
Update 25/03/23
– clarified that Cortex-M is thumb only, thanks to David Robertson who mentioned it in the comments.
Great article. Good to understand how analysis works when the manufacturer didn‘t encrypt his code. Would be interresting to get a rough number of encrypted code 50:50 or 80:20 or 99:1?
Thks Alex
Normally if something is encrypted, the images are encrypted. Since the code has to be unencrypted on the device (at least in basic devices like a ham radio), they are most of the time decrypted by the updater. I know that some major vendors like Moto or some Japanese vendors do that. Since the image has to be somehow decrypted to be installed, the decryption key is somewhere in the updater application or at least the algorithm to derive it from the update package. I literally never seen any vendor who implemented on-device decryption of updates. So it is all a matter of reverse engineering the updater application. That is sometimes quite easy, especially if the update is written in .NET or a similar language which you can simply decompile.
Once you decrypted (and sometimes unpacked) the update package of these vendors you will find the plain device image somewhere in the processed output. Once you got that it is very similar to the process described in this article to reverse engineer it.
A better load base is 0x8004000.
Thanks a lot Igor, I updated the article accordingly!
Igor (Hex-Rays developer) commented about your post on Reddit.
https://old.reddit.com/r/ReverseEngineering/comments/rv7etj/reverse_engineering_radios_arm_binary_images_in/
Can you go into more detail as to how you did all this? Or make a video? I’ve never messed around with firmware and almost all of this is Latin to me.
> Since this project is very Thumb heavy it is also advised to tick “No automatic ARM THUMB switching” in the “ARM specific options“.
It isn’t just “thumb heavy”, it will contain only Thumb code. Why? Arm Cortex-M devices only support Thumb instructions. By setting the base architecture to ARMv7-M, IDA will automatically force the “ARM instructions” setting to No.
Thanks for this info addition, yes thats correct. I will adjust it in the article.