It all started with my friend DK2HM bugging me about APRS for a while. First I wasn’t really interested since I considered packet to be somehow a old protocol. But after taking a few more looks into the protocol specs and APRS it somehow catched my interest. This was somehow the moment when my digipeater was born.
This was guide written for the GM350. But if you own another GM model it should be easy to adapt it. Most GM series Motorola devices which are programmable in the 144.xxx MHz range will work. I own a GM300 and a GM950, they all have the same 16 pin accessory connector. If your Model has a 20 pin connector, just ignore the first and last column of the connector and start counting from the second one. The pins are the same, the interface should work with them as well.
Ok enough preface, what will you need for this project? Here is a quick list:
- Motorola GM350 or similar device (see above)
- Some spare electronic parts and a solder iron to build the interface (see below)
- raspberry PI with a Linux of your choice (I prefer Ubuntu)
- USB Soundcard (about 5 Eur from Amazon)
- SDR or something else to check if the digipeater is working
Ths costs for this project should be less than 100 Eur, GM Motorola radios are easy and cheap to get. If you buy a raspberry, a 3b will work just fine. No need for the latest greatest.
Programming the GM350
A totally worn out headline on this blog lately. I wrote so much about how to program Motorola devices lately, one might get the impression I work in their marketing department. But keep calm, “our” Motorola is history.
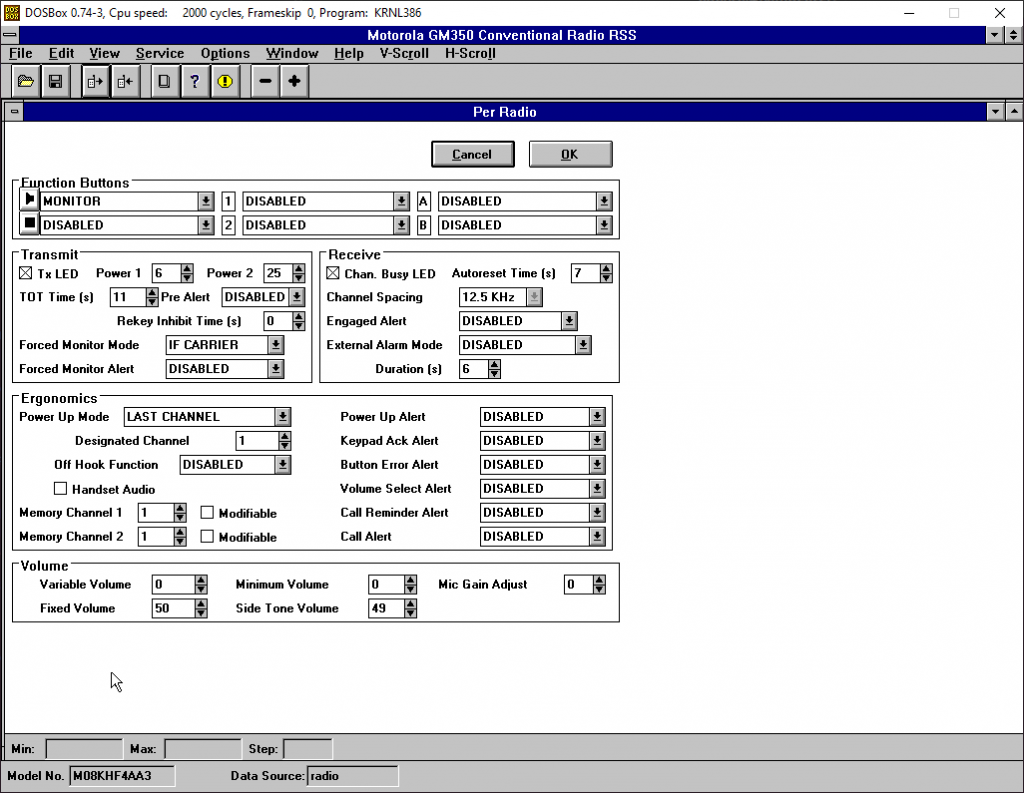
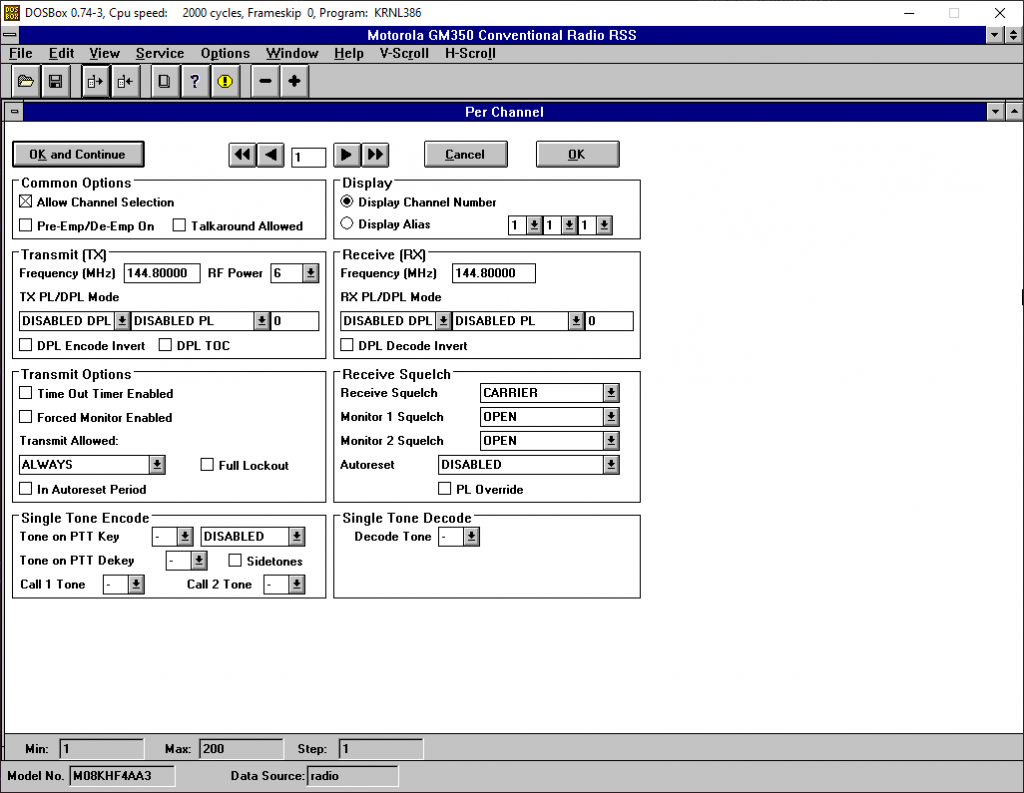
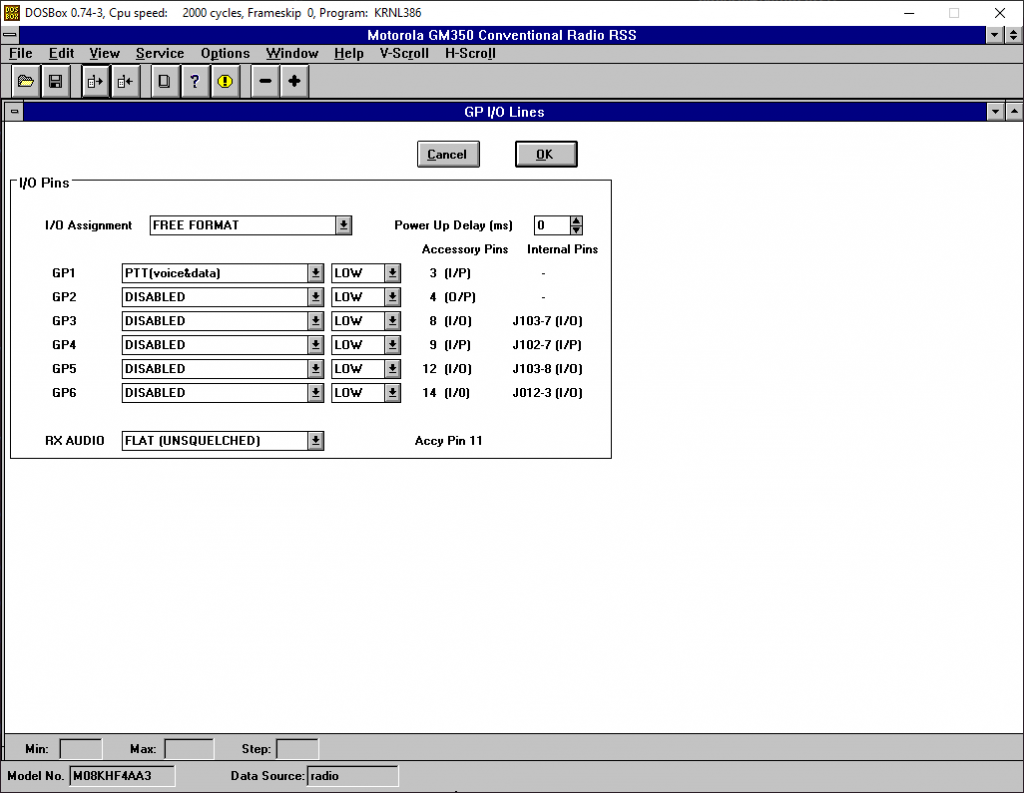
If you want to read about the basics, take a look here. It will guide you through the process to get the programming environment up and running. Once you have done that refer to the screen in the gallery below for the required settings. Make sure to copy them as shown. If you are in another region with a different APRS frequency (i.e. USA -144.390MHz) make sure to use your frequency instead of the shown one.
What you need to do is:
- Read the radio
- Edit -> Per Radio
- Edit -> Per Channel
- Edit -> GP i/O Lines
- Write to radio
That’s it for today, you can now move on and craft an interface cable. If you want to test the programming, just plug in a fitting antenna and turn the radio on. Switch to channel 1 if it isn’t selected yet and wait a bit. You should hear the typical APRS/Packet sound from the radio speaker if a packet is received. In case you never listened to APRS before, take a look here. SIGIDWIKI is great and they have audio samples of all listed signals.
Building the APRS Interface Cable
Ok the interface needs to have two things. A audio connection for RX Audio / TX Audio and a PTT switch. Since dire wolf is able to control the GPIO on the raspberry we will simply build a small NPN based circuit which switches PTT to ground.
First you need a NPN transistor, I used a 2N2222. This is a general purpose NPN and it can be used as a switch. To find out what parameters are needed to make it switch, take a look in the datasheet. You can find them everywhere on the net by just googling for them. Important are the VBE values which I marked below.
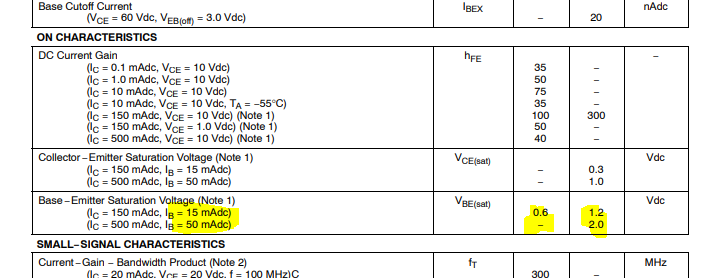
So what do we need? A Voltage between 1.2 and 2.0 V and a max. current of 50mA. I assume you are familiar with ohms law, so let’s calculate it quickly.
Ohm’s law:
\cfrac{U}{I} = ROur value, chosen with a little margin to the maximum values:
\cfrac{1,8V}{0,04A}=45\OmegaThis might not be ideal but it works in a real life setup. There was no 45 Ohm resistor in my boxes so I took a 47 Ohm, following the rule of thumb to select the next best one with a higher value around. You don’t have to stick with a 2N222 for this circuit, you can also use a BC546 with a 500 Ohm resistor. That is a combination which a lot of POCSAG people use to get their setups working on GM360 devices, it will work here too.
You will end up with the following high level schematics for the PTT. Simple isn’t it?
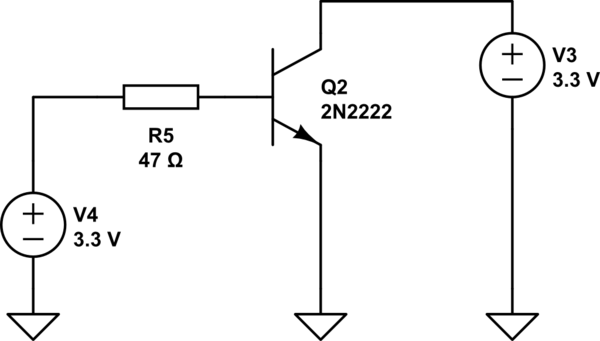
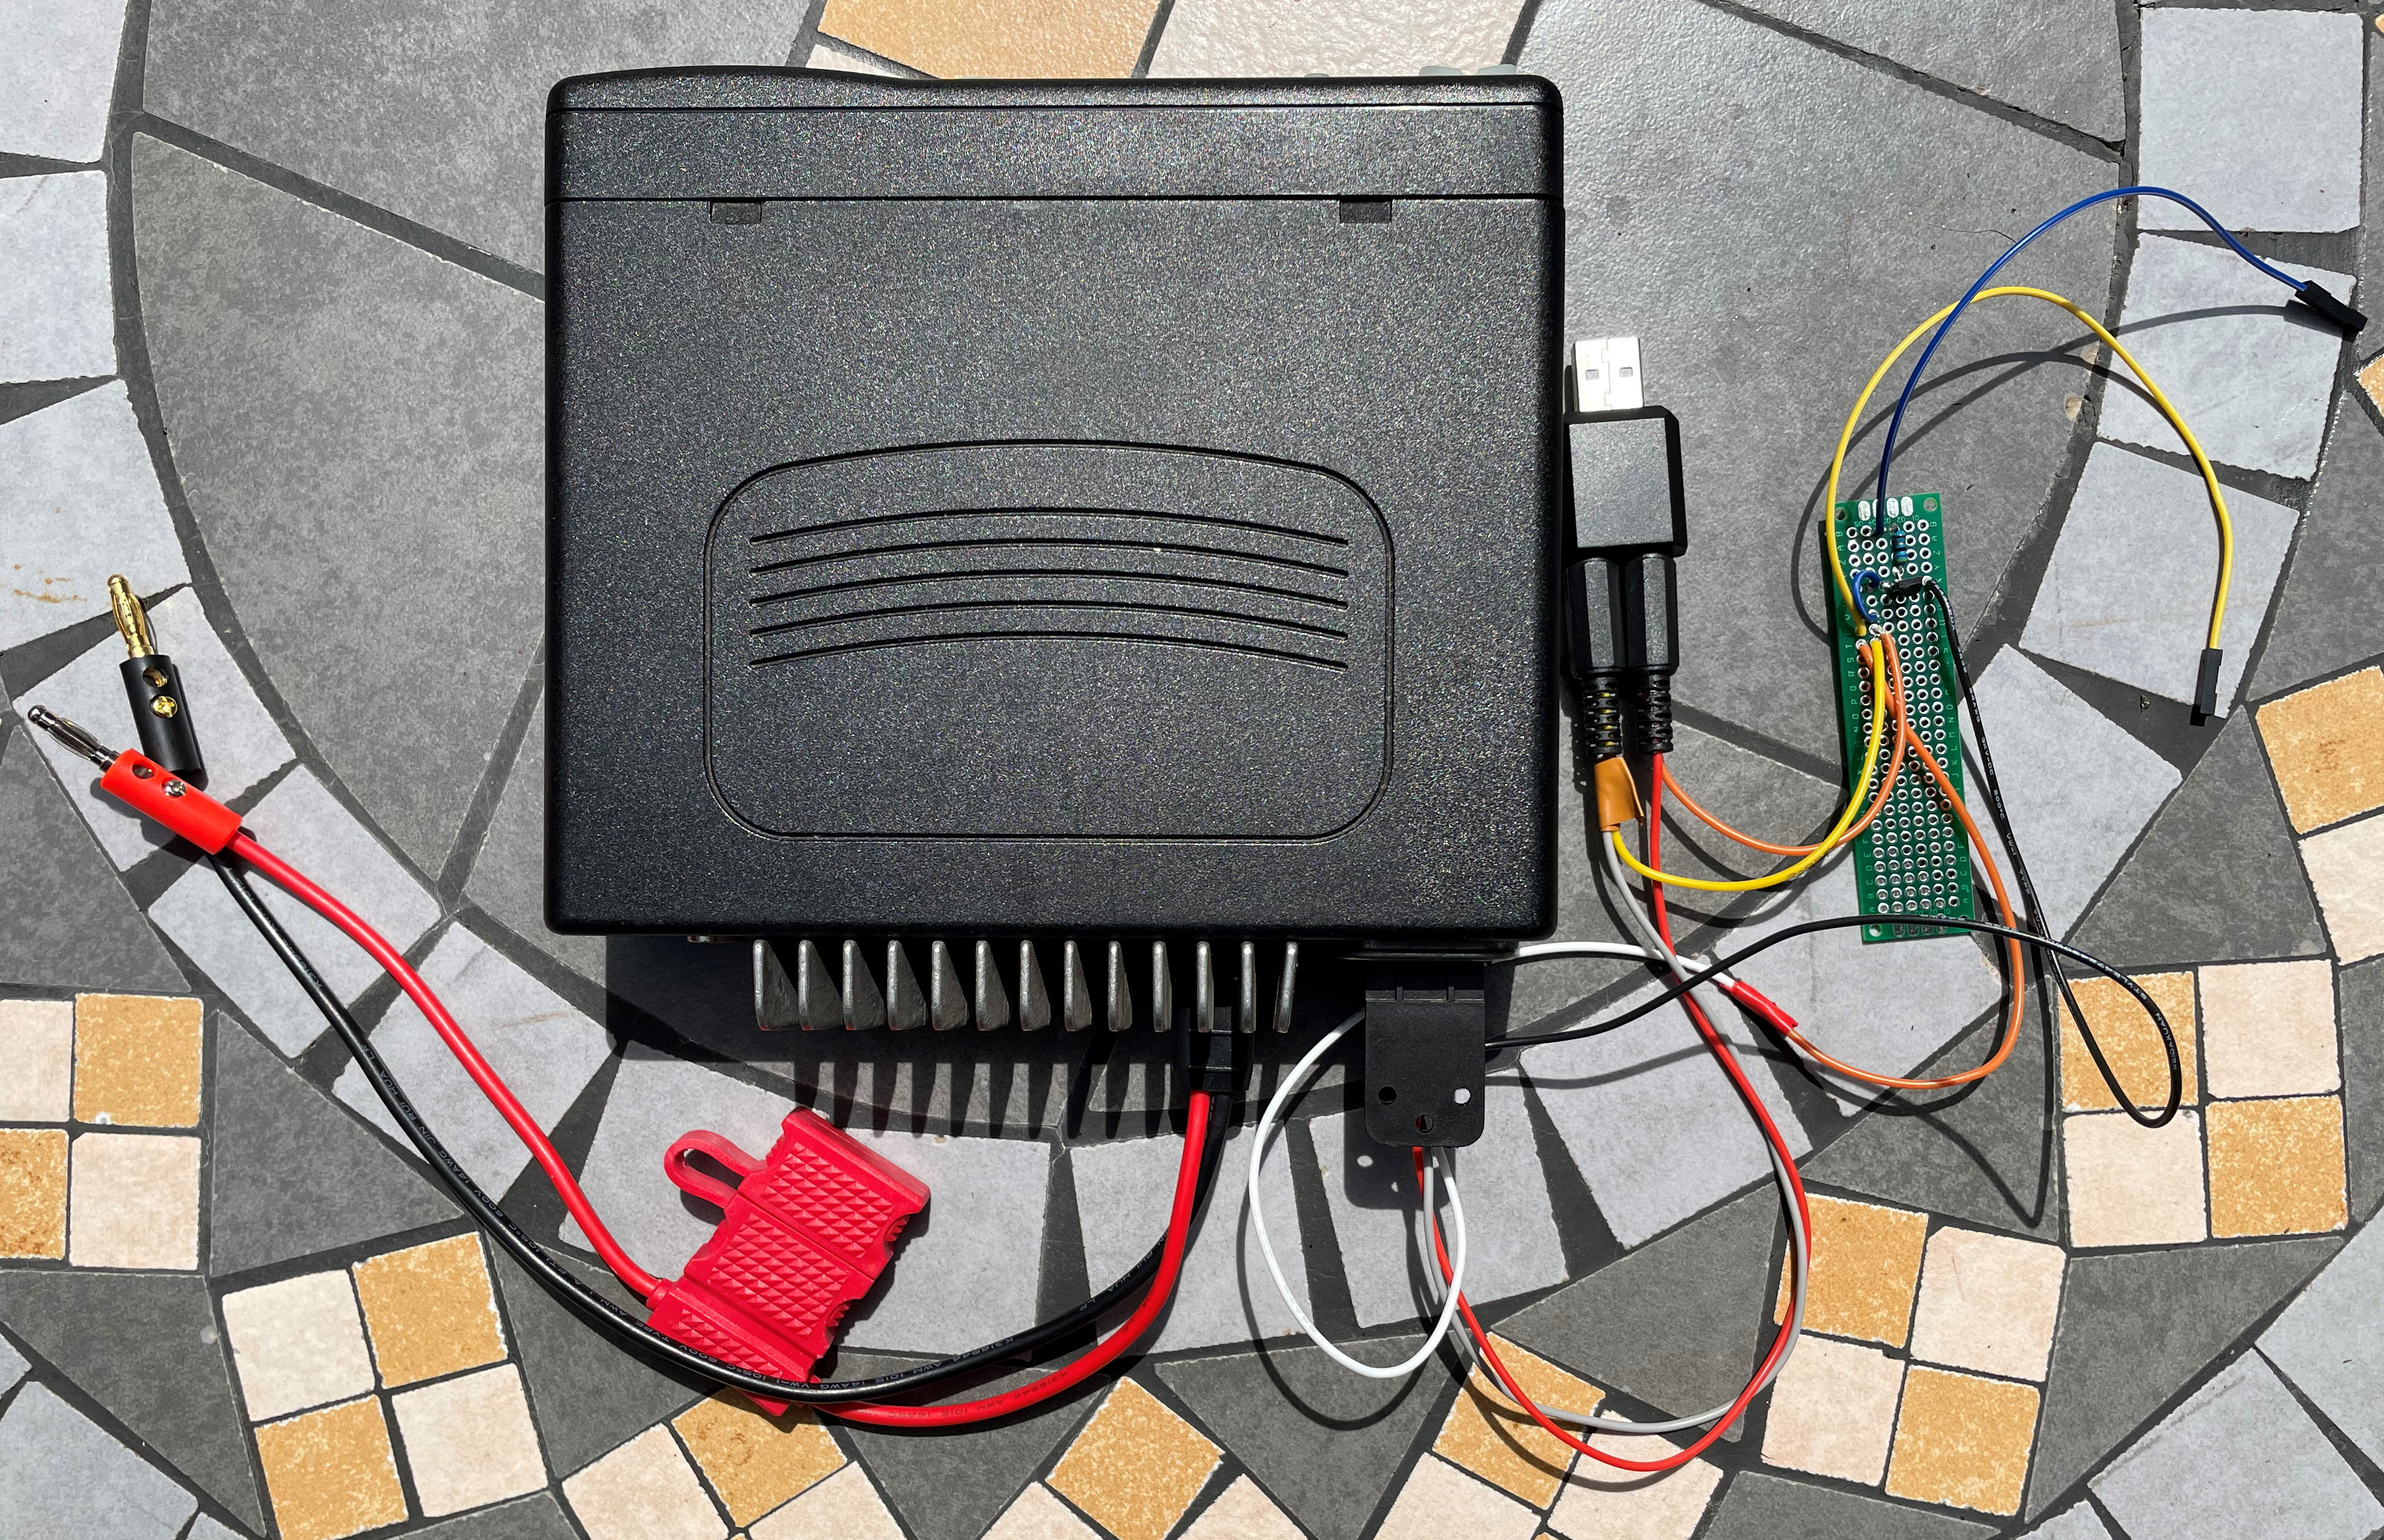
Putting everything together looks like this:
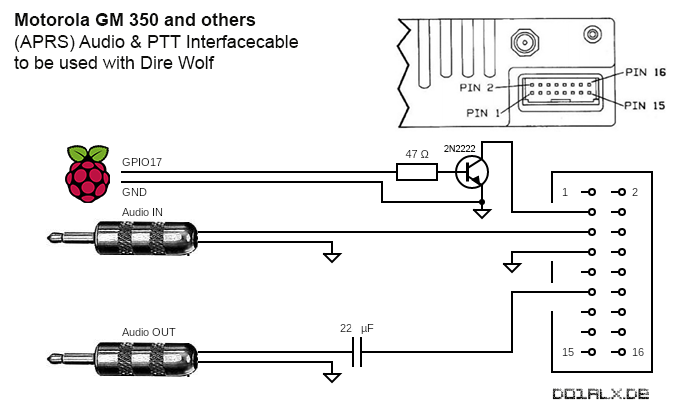
Bare with me for this drawing but it should tell you all you need. Make sure that all grounds are connected together. Even the one from the raspberry and radio. This only works with a common ground for all. The capacitator is simply there to filter possible DC parts if the sound card hasn’t one. for most modern soundcards it is not needed but it doesn’t harm to have it.
Setting up Dire Wolf
Dire wolf is a soundcard TNC modem. Dire wolf is short for “Decode Information from Radio Emissions for Windows Or Linux Fans”. It pretty much replaces the classical TNC with software and provides full APRS support and KISS via TCP. In case you need a Linux tty device, it is even capable to emulate you that. No need for hardware anymore.
Setting up dire wolf on ubuntu is quite simple, just use the following command to install it:
apt install direwolf After installation you need to open the direwolf.conf file and edit it. Below is a short transcript of mine with removed comments. Just copy paste it into an empty file and edit it to suite your needs.
ADEVICE plughw:1,0
ACHANNELS 1
ARATE 44100
CHANNEL 0
MYCALL NOCALL-10
MODEM 1200
PTT GPIO 17
AGWPORT 8000
KISSPORT 8001
FIX_BITS 0
DIGIPEAT 0 0 ^WIDE[3-7]-[1-7]$|^TEST$ ^WIDE[12]-[12]$ TRACE
IGSERVER euro.aprs2.net
IGLOGIN NOCALL-10 12345
IGTXVIA 0 WIDE1-1
IGTXLIMIT 6 10
If you want, you can add a BEACON or PBEACON to advertise your location. This is done by adding something like this line. Make sure you change your location and the message. For further information on this like please refer to the very good dire wolf documentation.
PBEACON delay=1 every=25 via=WIDE1-1,WIDE2-1 overlay=D symbol="digi" lat=48^00.00N long=011^00.00E power=4 height=5 gain=6 comment="NOCALL-10 2m APRS Digipeater" The next step is to enable the GPIO you want to use with dire wolf. Use the following commands as root to set the sound level and enable the GPIO. Please make sure your sound level is set properly, the below settings worked for me with this interface.
pacmd set-source-volume 1 23000
echo "17" > /sys/class/gpio/export
echo "out" > /sys/class/gpio/gpio17/direction
After putting the file in a location reachable from your system user, you can start dire wolf with the following command:
To make sure everything is set up correctly I wrote a launch script which I simply start in a screened console. Don’t worry if you see an error on one of the GPIO commands, if the pin is already enabled it will fail but that isn’t an issue.
#!/bin/bash
sudo pacmd set-source-volume 1 23000
sudo echo "17" > /sys/class/gpio/export
sleep 2s
sudo echo "out" > /sys/class/gpio/gpio17/direction
sleep 2s
sudo chmod -R 777 /sys/class/gpio/gpio17
sudo /usr/local/bin/direwolf -t 0 -c /home/user/direwolf.conf
You can also install it as a service or launch it with ” &” in the end so the process runs in background. Feel free to experiment here.
Congratulations, this part is already done.
Putting it all together
Now the time has come to put it all together. Make sure to connect GPIO 17 and GND correctly. If you have no idea where they are located, take a look here.
Plug the cable in or connect your cables to the pins. Turn on the radio and start direwolf. You should see something like below:
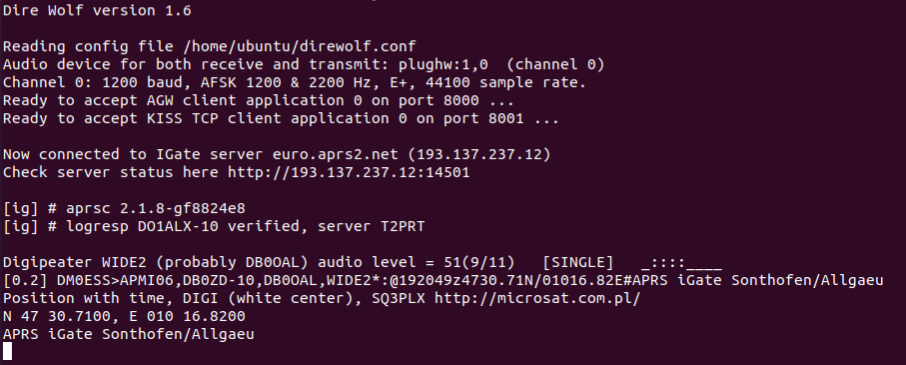
The startup shouldn’t show any error. The TX LED on the device will starts to light red if data is sent. If everything is as expected you are read to move to the final testing stage.
Final Testing
Now the SDR comes into play. Tune it to your local APRS frequency and take a look. On the SDR. If you have the radio turned on and direwolf running you should soon or later see your digipeater transmitting. Make sure to select a wide filter for testing. We know that APRS is normally NFM but for testing you can set the Radio to WFM and select a 200Mhz bandwidth.

Once you spot a transmission in direwolf make sure it shows up on the SDR too. If it shows up like above, congratulations! Your digipeater is alive. Don’t worry if it looks more broad in the SDR view. If you are very close to the TRX it will show up very strong in the waterfall. The effect is even worse if the antenna on the SDR is a bit trashy. I use my hackrf for this testing, it works great. The real signal ist just 12,5KHz max. (packet normally has a bandwidth of 10 KHz).
Next step? Now it is time to fill out the paperwork to apply for a special call and make it an automatic station. I hope to see many more new APRS digipeaters soon.
Thanks for reading. Got any questions? Feel free to leave a comment!
Und jetzt das ganze noch einmal auf deutsch.
73 de Marco, DO7NE
Hi. Thanks for sharing. One question: In your GM950 programming article you refer to this cable
http://maxtondata.com/product/maxton-data-rpc-mm-uf-ftdi-usb-programming-cable-for-motorola-gm300-m10-m100-m120-cdm1250-cdm1550-cdm1550ls-sportbase/
Does this really work with the GM350? The GM350 is not listed on that side (but the GM950 also not). And is it really just a FTDI based UART bridge?
Greets.
This cables works for a lot of devices. I made a note here:
https://do1alx.de/2021/programming-the-motorola-gm350-on-windows-10/
You can safely use this.
Hi,
Is your GM350 the 128 channel model?
Stewart M0SDM
Hi, I spent ages trying to get my 4 channel GM350 to co-operate, but then picked up a 128Ch model which has the connections at the back!!
I am using a raspberrypi 3B witha modified CM108 USB fob as a sound card. I attached to TX, RX and Gnd (GM350 pins 5,11,7) and used GPIO 17 on the PI as the PTT (PTT GPIOD gpiochip0 -17) in direwolf.conf. The PTT must be inverted as the GM350 expects the signal to go low to transmit.